Friday, December 28, 2012

Making Raw Almond Milk From Scratch


I love making my own almond milk. It's so incredibly easy. The best part is when my  two year old runs over when he sees the strainer to set things up and do his part. It lasts only 4-5 days, but it's usually all gone by then. Not only does it taste better than boxed almond milk, it doesn't have any odd additives that make you stop and think....what is that doing in my milk? Here's a great article by The Primal Parent on store bought almond milk additives. Try it, you may get addicted. 


Ingredients:

  • 1 cup almonds (soaked overnight or at least 6 hours)
  • 6-8 cups filtered water
  • 1/2 tsp lecithin
  • 1 tsp vanilla extract
  • 4 drops liquid stevia (or substitute with 2 dates, pitted and soaked with almonds overnight)
Note: all ingredients after water are optional. If you don't want to have to shake your milk all the time, lecithin helps it not separate and gives it a more creamy taste. The rest are just to your taste.
Soaking is also optional, but it helps get rid of some of the phytates, helps soften them, and begins the sprouting process with can increase the digestibility and nutrient content of your milk)

Get your blender ready. I love my Ninja, it's amazing!
Dump all your ingredients in and blend on high for up to 3 minutes. I just go by the look and then strain.
Use a metal strainer placed over a funnel to strain your milk either into a bowl or directly into a jar. You can also use a mesh bag but it gets pretty messy.
After straining all your milk, dump your almond pulp onto a cookie sheet to dry or keep in a cup in the fridge. I use mine in cookies, oatmeal, etc. 

Cap your almond milk and put in fridge for up to 5 days. Having a very clean jar to begin with helps the milk last longer. Mine usually lasts anywhere from 3-5 days. Enjoy! 


Wednesday, December 5, 2012

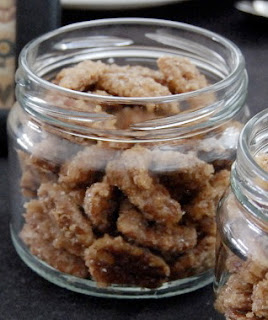
Candied Mixed Nuts


I've got a big, big sweet tooth. And as hard as I try, there is no avoiding it, I just love sweets. Wold God have made things sweet if we were not supposed to enjoy and live life to it's fullest. And when you pair sweetness with nuts, I can almost convince myself that it's healthy too. 


Ingredients: 
  • 3 cups nuts ( any kind, I used walnuts, peanuts, almonds, and cashews)
  • 1 egg white
  • 3/4 cup coconut sugar
  • 8 drops liquid stevia
  • 1/2 tsp cinnamon
Preheat oven at 250 degrees (not 350, like I did the first time I tried to make these). 
In a medium sized bowl, beat egg white.
Then, add in stevia first and beat well. Make sure stevia is well incorporated. 
Next, add sugar and cinnamon. 

Line a baking sheet with parchment paper and spread nuts out evenly. 
Bake for 30-50 minutes or until they reach desired consistency. 


Sunday, November 25, 2012

Wow, Look at That Gluten-Free Cake!


Imani Pratt, author of Give Me Gluten-Free may only be 17 years old, but she makes some of the best gluten-free deserts I've ever seen! Amazing and oh so inspiring! You have to try her Vegan Chocolate Cake with Aztec Spices. I couldn't help but think what a great wedding cake this would make. I may try it as a future birthday cake. Thanks Imani!

Friday, November 9, 2012

Wheat-Free Apple Cranberry Cake


This apple cake is surprisingly moist and tasty. It's another adaptation form The Gluten Free Goddess and well worth the prep time. Very highly kid approved as well. We had it for breakfast and then again later as a snack. 

Ingredients:

  • 1 cup brown rice flourGluten free apple cake with cranberries
  • 1/2 cup buckwheat flour 
  • 1/4 cup tapioca four/starch
  • 1 teaspoon baking soda
  • 1 1/2 teaspoons baking powder
  • 1/2 teaspoon fine salt
  • 1 teaspoon cinnamon
  • 1/4 teaspoon allspice
  • 1 cup coconut sugar

Wet ingredients:

  • 2 eggs
  • 1 teaspoon ground chia seeds
  • 1 teaspoon ground flax seeds
  • 1 teaspoon water
  • 1/2 cup olive oil
  • 1/2 cup applesauce
  • 1/2 cup rice 
  • 1/4 teaspoon lemon juice 
  • 2 tablespoons agave or honey
  • 2 teaspoons vanilla
The Good Stuff:

2 cups peeled and chopped apples
1/2 cup fresh or dried cranberries


Preheat oven to 350 degrees. Sift all dry ingredients up to the sugar. Then add in sugar and stir. 


Next, mix eggs, then prepare the chia/flax mixture. Grind chia and flax seeds and then mix with water until a paste is formed. (This replaces any xanthan gum.) You can grind in a hand grinder or in a coffee grinder for a finer powder. Add slurry to eggs. Add remaining ingredients to mix and combine. 

Add dry to wet ingredients and mix until smooth. Now add apples and cranberries. 
Oil a 9 inch round cake pan or use oiled parchment paper to make things easier. Pour in cake batter. Bake for 50-60 minutes or until firm in the center. 


Tuesday, October 30, 2012

Nutty Mandarin Quinoa Salad


Just make it. That's all I have to say. My work is done here. 

Ingredients:

  • 2 cups quinoa, dried
  • 1 cup golden raisins
  • 1 cup peanuts, toasted
  • 1 can mandarin oranges, cut in half
  • 3 tablespoons mint leaves, chopped
  • a dash of toasted sesame oil
  • 1/4 cup olive oil
  • salt to taste
Cook your quinoa in 4 cups boiling water, and turn down to a low simmer, cover. When all water has been absorbed, transfer quinoa to a cookie sheet and spread out until fully cooled. Toast your peanuts lightly in a frying pan and let cool as well. 

Add all your ingredients together in a large mixing bowl and toss lightly. Add some mandarin orange juice and sesame seeds if you like. Enjoy, it won't last long!


Friday, October 19, 2012

Thom Kha Gai Soup, aka. Thai Curry Coconut Soup With Shrimp


I can't get enough of this soup. It's really the best thing when the weather starts to get cold and damp. Play with the spice a bit,to your liking. This is an adaptation form My Thai Granmother's Cookbook, a must have. Don't overdoo your shrimp! 

Ingredients: 
  • 3 tablespoons fish sauce
  • 3 tablespoons lime juice
  • 2 tablespoons thai red curry paste
  • 1/4 teaspoon coconut sugar
  • 2 cups chicken or veggie stock
  • 1 cup unsweetened thai coconut milk
  • 5 thin slices fresh ginger root (or 2 tsp ginger powder)
  • 2 stalks fresh lemongrass, using white parts only, chopped into 2-inch pieces
  • 2 bruised and torn kaffir lime leaves
  • 8 torn mint leaves
  • 1 cup grape tomatoes, halved
  • 1 cup sliced mushrooms
  • 1 cup chopped carrots
  • 1/2 cup frozen peas
  • 1/3 cup sliced onion
  • 12 medium shrimp, peeled, deveined with tails intact
  • 2 tablespoons chopped green onions
  • 1/4 cup chopped cilantro
  • 1 teaspoon finely chopped Thai red chilies (optional)
First combine the first 4 ingredients in a cup and mix.  Combine stock, coconut milk, ginger root, lemon grass, and limes leaves and let simmer for 5 minutes until flavored. throw in mint leaves. Add veggies and curry mix and boil low for 6-7 minutes or until veggies are almost tender. 
Next, add in shrimp and boil for 1 minute. Take out so they don't overcook. Take out lemongrass, add the rest of ingredients and add shrimp back in when cool enough. 

Tuesday, October 16, 2012

Gluten-Free Vegan Pumpkin Pie- easy pumpkin pie recipe


Amazing pie, I swear! And a great crust. On my search for the perfect gluten-free crust, I found Gluten Free Girl's slightly involved but worth it pie crust. A flaky crust the hold together well and is highly nutritious. Here's my adaptation using no gums and adding chia and flax seeds. I made a triple batch, made two pies, and froze the third for a impromptu pie.  

A note for those with celiacs disease. If you absolutely need to make sure there is no cross contamination of your oat flour, use one like Bob's Red Mill oat flour. While visiting their factory, I was very impressed at the lengths they go to insure that their gluten-free products are truly free. And I just like Bob. After our tour, we found him in the lobby playing piano to his staff during a break.

Crust: 
  • 1 cup almonds 
  • 2/3 cup oat flour 
  • 2/3 cup tapioca flour
  • 1/2 cup teff flour
  • 1/2 cup potato starch
  • 1/4 cup sweet rice flour
  • 3 tsp flax seeds
  • 2 tsp chia seeds
  • 1 tbs cold water
  • 1/2 tsp kosher salt                                                                                                                
  • 5 tbs cold butter (sub with all coconut oil if you want totally vegan)
  • 4 tbs cold coconut oil 
  • 6 to 8 tbs ice-cold water
Filling: 
  • 1 can pumpkin puree 
  • 1 can coconut milk
  • 1 egg (or 1 tab flax seeds ground with 1 tbs water until frothy if needing to be more vegan!)
  • 1/2 cup maple syrup
  • 1/2 cup raw honey
  • 1 tsp cinnamon
  • 1/4 tsp ground cloves
  • 1/4 tsp ground nutmeg
  • 1/2 tsp ground cardamon


Process almonds into a fine meal, a powder if you can. Combine all dry ingredients in medium bowl. 

Back to our recipe, use a really good food processor, or better yet, a coffee grinder to grind seeds up to a powder. Mix with cold water in a cup. After frothing occurs, add mixture to flour mixture. 

Next, cut in cold butter and coconut oil. Use your hands towards the end until you get a fine corn meal texture. Add water until you get a dough with a consistency that is moist, but not tacky. Roll up your dough ball and when you push a finger in, it should come out clean. The ball should not fall apart in flakes when you're working it. Now put in fridge for 15 minutes. 


Roll out, and roll out thin if you can onto parchment paper. Flip into pie plate and peel away paper. No mess, thank you. Piece together any part that tears and crimp edges. 

Now for the filling. Just combine all ingredients and mix with a hand mixer until smooth. Pour into pie shell and bake for 55 minutes. Pie should be slightly jiggly, but sill firm enough. Put in fridge overnight and it help it firm up a bit. Pie is a bit less firm than most, but oh so good! Pies can be frozen as well. Enjoy!


Tuesday, September 18, 2012

Gluten-Free Walnut Brownies


Butter, chocolate, walnuts, sugar, what could be better? And oh yes, healthy too. Pretty healthy.
I've stayed away form brownies for awhile because I didn't want to be disappointed by the gluten-free aspect. Now, I can enjoy again. Oh my, you have to try these. 

Ingredients:
  • 1 cup almonds 
  • 2 cup chocolate chips
  • 2/3 cup brown rice flour
  • 12 tablespoons coconut oil (vegan) or butter (cut up)
  • 1 teaspoon salt
  • 1 cup coconut sugar (or other sweetener of choice)
  • 6 drops stevia extract
  • 2-3 teaspoon vanilla extract
  • 4 eggs (to replace eggs, use 1 tbs ground flax seed mixed with 3 tbs water per egg) 
  • 2 tbs ground flax/chia seed mix mixed with 2 tbs water (optional)
  • 1/2 cup walnuts or other fave nut
A note about using the flax/chia mix. If you haven't yet read up on my new discovery, it's time to try it out. Ground flax seeds mixed with ground chia seeds when combined with water create a gluten-like substance that can be a great substitute for xanthan gum. I've stopped using xanthan gum because it can often cause digestive issues and so I've traded it in for this mix. It's optional in this recipe, but it makes the brownies hold together better. 

Preheat oven to 325 degrees. Line a 8 x 8 square cake pan with parchment paper. 
Place chocolate chips in oven until melted, but not burnt. 
While chips are melting, put almonds in a food processor and grind to a meal or just use almond meal. 
I use fresh almonds because the good fats in them are preserved better than if in meal form previously. 
Mix almond meal with rice flour and salt in a bowl. 

Take melted chips out of oven to cool off a bit. 
In a large bowl, using a pastry cutter, a fork, or your fingers, combine butter and sugar until it looks like cornmeal. 
Now ad in melted chocolate chips and mix in. 

Next mix eggs (or fax mix if using), flax/chia mix, stevia, and vanilla in a separate bowl and add to butter mixture. Mix well. 

Now add flour mixture to wet mixture and mix until just combined. 
Add nuts and fold in. 

Bake for about 60 minutes. I know, you're probably sick of my vague timing, but keep an eye on it and use a toothpick to tell when it's done (when it comes out clean).  I would bake a double bath next time, these went oh so fast! Enjoy your gluten-free brownies!

Variation! 
Try adding 1/2 cup mixed pumpkin seeds and sunflower seeds in at end. Grind them in a food processor or coffee grinder until they are not yet a fine powder, but won't be too noticed by those picky fingers. Results are still very good, but a but bit denser. Great nutty taste and increases the essential fatty acids! 

Saturday, September 15, 2012

The Best Gluten-Free Quinoa Cookies


I had my doubts, but it's true you can make really good cookies and have them be healthy. Quinoa is the only grain that is a whole protein and has tons of vitamins and minerals. It's also so easy to cook...about 10 minutes and no fuss.

I added both sugar and dates to these cookies for some variety and it still keeps the glycemic index down a bit.
Here's the good stuff:

Ingredients

  • 1 1/2 cups Bob's Red Mill GF flour
  • 1/2 teaspoon baking powder
  • 1/2 teaspoon baking soda
  • 1 teaspoon salt
  • 1/2 cup (1 stick) butter, room temperature or melted
  • 1/2 cup coconut sugar (or other sweetener)
  • 12 pitted dates
  • 2 eggs (or 2 tablespoons flax seed processed with 2 tablespoons water, mix until frothy)
  • teaspoons vanilla extract
  • 1 cup cooked quinoa, cooled
  • 1 cup rolled oats
  • 1 cup dried cranberries or cherries
  • 1/2 cup walnut pieces or other favorite nut

Preparation

Preheat oven to 375°. Line 2 baking sheets with parchment paper. 
Mix flour, salt, baking powder, and baking soda in a medium bowl. 
Using a food processor, mix butter, sugar, and dates until it becomes a paste. 
Add eggs and extracts and mix until fluffy.
Remove from processor and transfer to a large bowl. 
Mix in flour mixture, 1/2 cup at a time. 
Then, add quinoa, oats, cranberries, and nuts. 
Spoon dough in 2-tablespoon portions onto prepared sheets.
Bake cookies until golden, approximately 30 minutes. Timing is tricky with gluten free baking, so just check on them until they are a nice golden brown-blondish. 
Transfer cookies to a wire rack and let cool.
These can be frozen for up to 1 month.


Saturday, September 1, 2012

Pickle Time


Pickling made easy. This year we went for the organic pickles. Pickling takes time and good oven mitts, but it's sure worth the effort. Pickled cukes are amazing and you can make tons of variations on our canning recipe below. There are lots of pickle recipes out there but here's our favorite:


How to pickle: 
  1. Buy your pickles straight from the farm if you can, if not try the farmers market, if not try to get the freshest store bought pickles possible. 
  2. Soak in an ice water bath for 3 hours to overnight. (Makes crisper pickles)
  3. Run jars through dishwasher or boil-sanitize. 
  4. Prepare your rack and canning tongs or Ball Canning Basket (my new favorite canning tool! So much easier.)
  5. Boil lids and screw tops in basket for a few minutes. I used Tatter canning lids this time and love them. The are BPA free and reusable unlike metal lids. A bit more tricky to use, but easy if you follow instructions well. 
  6. Put large canning pot with enough space with 2 jars submerged and bring to a boil.
  7. Begin brine on a large pot. For 12 quarts of pickles, appoximately 12 lbs of pickles, we used the recipe below:
    • 18 cups filtered water
    • 6 cups apple cider vinegar
    • 1/2 cup salt
    • a handful of peppercorns and mustard seed
    • a whole bunch of dill (about 2-3 seed heads per jar)
    • 12 bay leaves
  8. Bring brine to a boil and turn off after a few minutes.
  9. Use 2-3 grape leaves in the bottom of each jar or a 1/4 tsp of Pickle Crisp Granules
  10. Add 2-4 pealed garlic cloves to each jar.
  11. Add any other herbs (I added lavender to the jar below and who knew it was going to taste so good!) 
  12. Take pickles out of bath and rinse again to clean as you pack them into the jars as tight as possible. 
  13. Then ladle brine into jars leaving 1/2 inch of room at top. 
  14. Wipe rims clean and place lids on. Do not secure tightly, leave them a bit loose to let air escape when in pot.
  15. If using basket, put 2 jars in at a time. Kind of a pain in the ass, but it's all that will fit. Otherwise place a few jars on your rack and let it do it's business for about 15 minutes. Water has to cover tops by a few inches! Otherwise air won't be able to escape and vacume won't be created. 
  16. Take jars out and if you have to move them, be very careful and just let them sit there until they are cooled. If you mess with them too much, the seal could get disturbed. 
  17. After processing all the jars, just let them sit and cool. When they are done, take screw caps off and test seal by pushing down on the top to see if it gives at all (for metal lids) or tapping a bit on the side of the lid to see if it moves (if using Tatter lids). 
  18. If you have a tight seal, it is time to screw the caps down (or not, if you choose) and put up on a shelf where you can admire them! 
  19. Your pickles will be ready to eat in a week, but are best after 3 weeks and good up until a year. 


Below were last years, very colorful! The above recipe is just for your classic dill pickle, nothing so fancy. 


Thursday, August 30, 2012

Gluten-Free Blueberry Cake


A great little snack. Here is a gluten-free variation of The Country Cook's version. And yes, it's been great as a breakfast treat. I made a double recipe, cut, and wrapped up half to freeze. I was not sure what flour mixture to use, but I've come to love an arrowroot and brown rice flour mix. If you'd like to learn more about mixing your own gluten-free flour mixes check out Gluten-Free Girl's posting. She breaks I all down for us novices. Now let's get down to business. 

Ingredients: 


  • 1/2 cup butter
  • 2 tsp orange or lemon zest
  • 1/2 cup coconut sugar
  • 1/2 cup agave
  • 1 egg
  • 2 tsp GF vanilla extract
  • 2/3 cup arrowroot 
  • 1&1/4 cup brown rice flour
  • 1/4 tsp salt
  • 2 tsp baking powder
  • 2 cups blueberries
  • 1/2 cup rice milk (cow milk, almond, hemp, or oat milks all work as well)


  1. Preheat oven to 350 degrees. I prefer to use parchment paper and lined a 9X9 baking dish. You can also butter the dish instead. 
  2. I melted the butter because I did not have softened butter and it worked well. Add sugar, vanilla, and agave and beat with a mixer. 
  3. Mix dry ingredients in separate bowl. 
  4. Save 1/4 cup flour flour blueberries.
  5. Slowly add in flour and milk alternating until all combined. 
  6. Toss blueberries in flour and then add to batter. 
  7. Bake for 60-80 minutes or until a toothpick comes out clean. (Gluten-free baking takes a really long time, but set a timer. I've forgotten a few times and it really sucks when you're expecting a tasty treat!) 


Monday, August 27, 2012

Kombucha 101- what is kombucha?


This week Chef Fox went all out. He may be only 2, but he's got very sophistocated taste. On a whim while visiting the Lion Heart Kombucha shop in Portland, Oregon he was inspired to do some home brewing. Or shall I say, home fermenting. 

We left with a "SCOBY" (symbiotic culture of bacteria and yeast) also called the "mother" in a jar and lots of excitement. 


A bit about kombucha for those of you who may be as skeptical as most are when first seeing the fermentation process. So what is kombucha? It just looks disgusting. Not to worry though, after filtering it will look more like the kombucha you're used to from the store. Kombucha is a probiotic drink that has many health benefits including tons of healthy bacteria, enzymes, and micronutrients. It has been made for thousands of years and is worth giving a try. 


Now for The Chef's process. 

Kombucha Recipe:

  • First, he got his SCOBY and ran a jar though the dishwasher. Or you could clean it with very hot water to get out any uninvited bacteria that may want to hitch a ride. Avoid soap, or at least make sure all soap is gone before beginning. Soap can really inhibit the growth process. 
  • Next, Chef Fox brewed up some strong green tea. Feel free to add any herbs you like. Chef Fox is a purist and just used premium Jasmine tea. He brewed about a quart, mixed one cup of plain white sugar in and let it cool completely. Other sweeteners would probably work, but the simple sugar works best because then the bacteria can break it down and use it for fuel more easily. Don't worry, your kombucha won't be intensely sweet after the bacteria have their way with it. 
  • When cooled, he dumped it into a large glass jar and added cool filtered water until almost full. 
  • Then, The Chef carefully poured the SCOBY into the jar. 
  • Lastly, he placed a clean rag on top of the jar and secured it with a big rubber band. 
  • And now we anxiously await. Checking on it every day or two to see what has happened. The SCOBY has grown exponentially.
  • When to your taste, filter using a small strainer. Usually, kombucha will take 3-5 days to be ready to bottle for the second fermentation. Just taste until almost all sweetness is gone, but your kombucha has not turned into vinegar. You can just stop here and bottle or do a second fermentation that will make your beverage fizzy. 
  • Put in bottle with a cap and keep in the fridge if you've chosen to be done here. 
  • If you chose to go for the second fermentation, add 1/4 cup sugar to the bottle and shake. Now let ferment for 2-3 weeks. If your kombucha is super sweet, then let sit longer and remember to use less sugar next time. 
  • When completely done, your drink should taste very mildly sweet. Cap and place in the fridge. 
Enjoy and begin your next batch because a huge jar only lasts about a week in our house.

Below is a picture of the next batch. We started it the same way, but instead of steeping just green tea, Chef Fox added a handful of elderberries, nettle leaf, red raspberry leaf, and peppermint to the brew. We let this steep for at least half an hour or until cool. Then we dumped the tea through a strainer into the kombucha jar. Now it will brew for 2-3 weeks or until it begins to change in taste. 


Note!! 

Don't leave your SCOBY without any liquid. Leave an inch or two to help feed the SCOBY until you begin your next batch and cover up. Otherwise you'll have drunk fruit flies around your house. And if you're not going to make a new batch for awhile, feed your little SCOBY with some water and sugar so it doesn't die. 


Saturday, August 25, 2012

Caprese Salad


So easy. It's tomato time and so get out your mozzarella. As simple as this recipe is, I often forget about this dish. And if you're Italian like me, you have no excuse. Now go pick some tomatoes and make your grandma proud! 

Ingredients:
  • 1 ripe tomato
  • 1 lb mozzarella (big or small balls, if big then thinly slice them)
  • a handful of fresh basil leaves
  • 3 tablespoons olive oil
  • 2 tablespoons balsamic vinegar
  • salt and pepper to taste
Slice tomatoes. Layer with basil leaves. Place mozzarella on side, or layer with tomatoes if using large size. Drizzle on oil and vinegar. Add salt and pepper. Eat-


Tuesday, August 21, 2012

Blueberry Green Smoothie


Oh, there is nothing quite like a cold smoothie on a hot summers day, or really any day for that matter. 
Now, not every smoothie is equal. The keys to a good smoothie are banana and ice. Bananas add that creamy texture and sweetness that really makes a smoothie a good one. And the ice creates a frozen treat that seems like more desert than healthy drink. 


For my boys, it takes a little extra to get them to eat anything that is a veggie. So here is where I hide them. You'd never know this smoothie has beet greens and a superfoods powder. 

Blueberry Smoothie Recipe:
  • 1 cup frozen blueberries
  • 1/2 cup frozen strawberries
  • 1 peach, pear, or nectarine
  • 1 banana (frozen is good if you've got some)
  • 1/2 cup coconut milk 
  • 1 cup beet greens, spinach, or kale (stems removed if really tough)
  • 8 ice cubes
  • 1 scoop Amazing Grass Green Superfood (berry flavor is good and tons of nutrients. It has wheat in it but before the seeds are produced, it's supposed to be gluten-free and works well for us)
Optional:
  • 2 tablespoons agave, honey, or maple syrup (if you want to make sure the kids will devour it)

Now, I love my new blender. I was skeptical, because it's advertised on TV. But The Ninja Professional Blender is really amazing. It has blades in the bottom, middle, and upper parts of the blender, so it works really well and fast. I must use it several times a week and it's a great smoothie maker. And when I saw two chefs standing in line to buy one, I was suckered in. 

So my point is, get out your blender.
Then, place all the ingredients in and blend away for about 1/2 minute or until smooth. Adjust with more ice or water until you get your desired consistency. I like mine like yogurt. Stick in a straw, or if you want to get fancy, add a few flowers and serve. Makes 3 large glassfuls. 


Friday, August 17, 2012

Gluten-Free Baked Berry Oatmeal


We must make this at least once to four times a month. It's huge but lasts about  a week. This is yet another inspired creation from one of my fave cooks, Heidi Swanson. This recipe was adapted from her newest book, Super Natural Everyday with a few adjustments for the finer pallets in the family. Mainly, Chef Fox. 

But as you see above, it passed the Hand Test. The Hand Test is a very good indicator of whether or not the dish will be a hit. If it doesn't even make it to the oven without a hand creeping over to steel a taste, it has passed. 

Ingredients

Dry:

  • 2-3 large bananas (cut into slices)
  • 3 cups gluten-free rolled oats (I use Bob's Red Mill because they ensure that their line of GF grains are truly gluten-free)
  • 1-2 cups finely shredded coconut
  • 2 cups chopped walnuts (or other favorite nuts)
  • 1/2-1 cup coconut sugar
  • 1 tablespoon baking powder
  • 2 tablespoons cinnamon
Wet: 
  • 3 cups almond milk (rice, soy, etc. work fine, but don't use regular milk. I tried it and the results were awful!)
  • 2 eggs
  • 1/2 cup melted butter
  • 1-2 tablespoons vanilla
  • 10 drops liquid stevia (optional-if you like your sweeter)
  • 2-4 cups berries: I used blueberry and strawberries, but get creative!

Preheat your oven to 375 degrees. Butter a large lasagna pan and layer the sliced bananas on the bottom in 1 to 2 layers. Then, mix up your dry ingredients in a large bowl. In another bowl. Pour 1/2 of mixture over bananas. Add a layer of berries. And again the rest of the dry oat mixture. Top with the remaining berries. 


Mix all your wet ingredients, Chef Fox likes to add the butter last. Pour over oat mixture and give a few thunks of the pan to make sure it seeps all the way down into the pan and wets everything. It should look a bit wet and soggy on the top, but not swimming in liquid. Adjust as necessary. Now bake for 45 minutes. After taking out of the oven, let the oatmeal sit for at least 10 minutes to settle and cool off a bit. Enjoy with yogurt or milk or ice cream or simply alone. Add maple syrup as needed, because you know we all need a little maple syrup in our lives. 


Friday, August 10, 2012

Zucchini Cranberry Bread- gluten-free, low sugar


If you haven't noticed, zucchinis are everywhere. If you live in a city, you just wouldn't understand. Take a big pot, plant yourself a zucchini plant, and put it out on your fire scape. Now watch it grow, and never stop. I had no idea of how much zucchini could come from one plant until I moved out of New Your City. 

But what to do with all that lovely squash? Bread. And you'd be surprised how amazing it tastes. For a good recipe, I turned to The Gluten Free Goddess. I am never disappointed by her recipes. Below is my version. I added I some butter (for taste and just because I love the stuff), cut down on the xanthan gum (texture is a bit odd sometimes and isn't always digested well), swapped out the brown sugar for coconut sugar , dates, and prunes (lower combined glycemic index, adds fiber, and good as a combo), added cranberries, and lastly increased the vanilla just because I could. It's passed my picky children's test, now you give it a try. 

Ingredients:


  • 1 cup grated zucchini 
  • 1 cup sorghum flour
  • 1/2 cup tapioca starch/flour (Bob's Red Mill is wonderful and ensures gluten-freeness)
  • 2 teaspoons baking powder
  • 1/2 teaspoon baking soda
  • 1/2 teaspoon xanthan gum
  • 1/2 teaspoon fine sea salt
  • 2 teaspoons cinnamon
  • 1/2 cup coconut sugar
  • 6 dates (pitted of course)
  • 6 prunes1/3 cup melted butter (olive oil/ coconut oil if vegan)
  • 2 egg whites
  • 1/4 cup coconut milk (I use Native Forest, they have very sustainable practices)
  • 1 teaspoon lemon or orange juice
  • 2 tablespoon vanilla
  • 1/3 cup chopped walnuts 
  • 1/3 cup dried cranberries


optional:

  • 1/3 cup chocolate chips


First, preheat your oven to 350 degrees and butter a 8x8 baking dish or lining it with parchment paper. Start by sifting all the dry ingredients together (not sugar). Grate the zucchini and place it all in an absorbent kitchen towel and wring all the moisture you can out of it. Put in a bowl and fluff with a fork. 

Next, place butter in oven or saucepan to melt. Combine dates, prunes, sugar, coconut milk, juice, and vanilla in a blender and mix until the dried fruits are well processed. Now add the eggs and melted butter and blend for a few seconds or until just mixed. 

Combine wet and dry ingredients in a large bowl. Add nuts and chocolate chips if using. Either cranberries or chocolate chips, don't go crazy here or you might wind up with a granola bar. Check after 60 minutes, but mine took almost an hour and a half. After adding the dried fruit, it made it a bit moister and took more time. But bake until a toothpick stuck in the center comes out clean. And let me know what you think!

Monday, July 16, 2012

Berry Coconut Sparkle


It's hot, and I can't do hot. But I can do hot if I have an iced beverage with berries in it. And lots of ice.

Here's how:


  • 2 cups coconut water
  • 1/4 cup seltzer or other kind of sparkle
  • 1-2 tsp lemon juice
  • a handful of berries (I used raspberries) 
  • 1 sprig mint ( I used basil, but mint would be better) 
  • 3 drops liquid stevia
This is my version of a version healthy mojito. After wither being pregnant or nursing for the last 6 years, I had to get creative. I don't believe in doing the "pump and dump" method. This tastes better too. 

First, fill glass with 1/3 crushed ice cubes. Add about 3-5 mint leaves, raspberries, and stevia. Crush with a muddle or you can even use a rock if you don't have one. when leaves are bruised, add the rest of the ingredients. Garnish with a sprig of mint and enjoy.